
Als het gaat om het maken van selecties in Photoshop, zijn er echt twee soorten mensen: zij die weten hoe ze de Pen-tool moeten gebruiken en zij die het moeilijk hebben. De meeste mensen stellen het leren van het Pen-hulpmiddel zo lang mogelijk uit, terwijl anderen het nooit leren, omdat ze vinden dat het gewoon te verwarrend, te ingewikkeld en gewoon onnatuurlijk is.
Uiteindelijk lijdt hun werk in Photoshop daaronder, omdat ze vastzitten met de Lasso Tool voor zowat alles wat ze niet kunnen selecteren met de rechthoekige of elliptische selectiekadertools. In deze Adobe Photoshop-tutorial gaan we een einde maken aan het lijden. We gaan leren hoe eenvoudig het echt is om selecties te maken met het gereedschap Pen.
Als ik nu "gemakkelijk" zeg, bedoel ik niet dat je deze tutorial gaat lezen en meteen wordt omgezet in een Pen Master. Leren hoe je het gereedschap Pen gebruikt, lijkt veel op leren fietsen. Als je eenmaal hebt geleerd, lijkt het volkomen natuurlijk en je zult je afvragen hoe iemand misschien niet zou weten hoe zoiets eenvoudigs te gebruiken. Maar om op dat punt te komen, is een beetje oefening en inspanning vereist, en tijdens het lezen van elk boek over hoe je moet fietsen, leer je misschien de basisprincipes van hoe de pedalen, versnellingen en remmen werken, het is niet totdat je op de fiets worstelt om je evenwicht te bewaren dat het echte leren begint.
Een van de leuke dingen van de Pen Tool is dat het niet iets is dat exclusief is voor Photoshop. Verre van! Vrijwel elk populair fotobewerkings-, grafische en pagina-indelingsprogramma gebruikt de Pen-tool in een of andere vorm, dus als je eenmaal hebt geleerd hoe het te gebruiken in Photoshop, heb je al een goed begrip van hoe het te gebruiken in veel andere programma's ook!
Waar vind ik het gereedschap Pen?
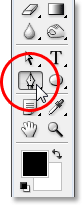
Voordat we beginnen te praten over wat de Pen Tool is of hoe het te gebruiken, moeten we eerst kijken waar we het in Photoshop kunnen vinden. U vindt het gereedschap Pen in het palet Gereedschappen, gegroepeerd met het gereedschap Vorm, het gereedschap Tekst en de Padselectie (de witte pijl) en Directe selectie (de zwarte pijl) (zie de afbeelding links).
Het gereedschap Pen van Photoshop
Dit kan natuurlijk de vraag opwerpen waarom, als we selecties kunnen maken met het gereedschap Pen, het niet is gegroepeerd met de andere selectietools (het gereedschap Rechthoekig selectiekader, het gereedschap Elliptical Marquee, het gereedschap Lasso, enz.) de bovenkant van het Tools-palet? Waarom is het daar beneden met die andere tools die duidelijk geen selectietools zijn?
Dat is een uitstekende vraag, en toevallig is er een uitstekend antwoord, waar we zo meteen op terugkomen.
Waarom wordt het de 'pen'-tool genoemd?
Een van de eerste struikelblokken bij het leren gebruiken van de Pen Tool, zoals bij veel andere dingen in Photoshop, is de naam, want als er één ding is dat iedereen die ooit heeft geprobeerd het te weten, dit ding is geen pen. Tenminste, niet het soort pen dat je normaal zou denken als je het woord "pen" hoort. Probeer je naam ermee te schrijven op dezelfde manier als je je naam op een stuk papier kunt ondertekenen met een pen en je zult waarschijnlijk eindigen met een verwarde, verwarde puinhoop en dingen die over elkaar heen lopen (natuurlijk, ik veronderstel dat kan heel goed zijn hoe je je naam ondertekent).
 Pierre Bezier
Dus als het niet werkt als een traditionele inktpen, waarom wordt het dan de Pen-tool genoemd? De Pen Tool is in de loop der jaren eigenlijk verschillende dingen genoemd, en daarmee bedoel ik niet het soort dingen dat je het in momenten van frustratie hebt genoemd. Je hebt misschien gehoord dat het de Bezier Pen of de Bezier Tool wordt genoemd, en dat komt omdat het is gemaakt door een man met de naam Pierre Bezier (dat is hem aan de linkerkant), een Franse ingenieur en een slimme kerel die de hele tijd op de proppen kwam mooie wiskunde die de tool aanstuurt tijdens het werken voor het autobedrijf van Renault (de Pen Tool is oorspronkelijk gemaakt om auto's te helpen ontwerpen).
Je hebt misschien ook de Pen Tool gehoord die de Paths Tool wordt genoemd, en dat is echt de meest geschikte naam ervoor. Het gereedschap Pen draait helemaal om het tekenen van "paden". Om selecties te maken met het gereedschap Pen, zetten we het pad of de paden die we hebben getekend eenvoudig om in selecties. Het begint echter altijd met een pad.
Plug-in shortcodes, acties en filters: fout in shortcode (ads-basics-middle-2)
Wat is een pad?
Een "pad" is, eerlijk gezegd, iets dat misschien een beetje misplaatst lijkt in een programma als Photoshop. De reden is dat Photoshop voornamelijk een op pixels gebaseerd programma is. Het kost de miljoenen kleine vierkante pixels die een typisch digitaal beeld vormen en doet er dingen mee. Paden hebben daarentegen absoluut niets met pixels te maken, daarom zei ik dat ze misschien niet op hun plaats lijken in een programma dat voornamelijk wordt gebruikt voor het bewerken en tekenen van pixels.
Een pad is eigenlijk niets meer dan een lijn die van het ene punt naar het andere gaat, een lijn die volledig onafhankelijk is van en niets geeft om de pixels eronder. De lijn kan recht zijn of gebogen, maar hij gaat altijd van het ene punt naar het andere en zoals ik al zei, heeft het helemaal niets te maken met de pixels in de afbeelding. Een pad staat volledig los van de afbeelding zelf. In feite is een pad zo gescheiden dat als u probeerde uw afbeelding af te drukken met een pad zichtbaar op uw scherm, het pad niet op het papier zou verschijnen. Ook als u uw afbeelding als een JPEG.webp-bestand hebt opgeslagen en naar een website hebt geüpload, zelfs als u de afbeelding met het pad op uw scherm in Photoshop hebt opgeslagen, ziet u deze niet in de afbeelding op de website. Paden zijn alleen voor jou bedoeld en Photoshop. Niemand anders zal ze ooit zien, tenzij ze toevallig langs uw computer lopen terwijl u werkt.
We hebben altijd minimaal twee punten nodig om een pad te maken, omdat we moeten weten waar het pad begint en waar het eindigt. Als we genoeg punten gebruiken om ons pad terug te brengen naar hetzelfde punt waar het begon, kunnen we verschillende vormen maken uit paden, en dat is precies hoe de verschillende vormhulpmiddelen van Photoshop werken. Het gereedschap Rechthoek gebruikt paden, verbonden door punten, om een rechthoekige vorm te tekenen. Het ellipsgereedschap gebruikt paden, verbonden door punten, om een elliptische vorm te tekenen, enzovoort. Het is ook hoe Photoshop's Type Tool werkt, hoewel Photoshop het type een beetje anders behandelt dan het reguliere vormen verwerkt, maar alle typen in Photoshop zijn in wezen gemaakt van paden. Je kunt het type zelfs in vormen omzetten, wat je dan allemaal dezelfde padbewerkingsopties geeft met het type dat je krijgt als je met vormen werkt.
Je hebt misschien ook paden gehoord die contouren worden genoemd, en dat is een redelijk goede beschrijving van wat een pad is, of tenminste, wat een pad kan zijn. We kunnen een vierkant pad tekenen, en als we er niets anders mee doen, omdat we het niet met een kleur vullen of er een lijn op toepassen, dan hebben we alleen een basisoverzicht van een vierkant. Hetzelfde met een cirkel of een andere vorm die we tekenen. Het pad zelf is slechts de omtrek van de vorm. Pas als we iets met het pad doen, zoals het opvullen, een lijn toepassen of het omzetten in een selectie, wordt het pad eigenlijk iets meer dan een basisoverzicht.
U kunt een volledig pad selecteren met het gereedschap Padselectie (ook bekend als de "zwarte pijl"), of u kunt afzonderlijke punten of padsegmenten selecteren met de tool Direct selecteren (de "witte pijl"). Een pad "segment", of "lijnsegment" zoals het soms wordt genoemd, is elk pad tussen twee punten. Een rechthoekig pad bestaat bijvoorbeeld uit vier punten (één in elke hoek), en de afzonderlijke paden die de punten met elkaar verbinden langs de bovenkant, onderkant, links en rechts om de vorm van de rechthoek te maken, zijn de padsegmenten . Het daadwerkelijke pad zelf is de combinatie van alle afzonderlijke padsegmenten waaruit de vorm bestaat.
Dat kan een beetje verwarrend zijn, dus laten we eens kijken wat ik bedoel. Open een nieuw document in Photoshop. Het maakt niet uit hoe groot het is. Ik kies de grootte 640x480 uit de lijst met voorinstellingen, maar zoals ik al zei, het maakt niet uit welke maat je kiest. Selecteer uw gereedschap Pen in het palet Tools. U kunt ook het gereedschap Pen selecteren door eenvoudig op de letter P op uw toetsenbord te drukken.
De twee pen-gereedschapsmodi
Voordat we verder gaan, moeten we er eerst voor zorgen dat we met paden werken, en dat komt omdat de Pen-tool eigenlijk twee verschillende modi heeft waarin hij kan werken, en standaard gebruikt hij de andere. Als het gereedschap Pen is geselecteerd, zien we een groep van drie pictogrammen als we omhoog kijken in de optiebalk boven aan het scherm:

De optiebalk in Photoshop toont de groep van drie pictogrammen die elk van de drie modi van het gereedschap Pen vertegenwoordigen.
Ik weet dat ik zei dat er twee modi zijn waarin de Pen-tool kan werken en toch, om dingen verwarrender te maken, zijn er drie pictogrammen, maar het pictogram aan de rechterkant, het pictogram voor het vullen van pixels, is grijs en niet beschikbaar tijdens het werken met het gereedschap Pen. Het is alleen beschikbaar wanneer u met de verschillende vormgereedschappen werkt, dus er zijn eigenlijk maar twee pictogrammen waar we naar moeten kijken.
Het pictogram links is het Vormlagen-pictogram, ook bekend als "niet degene die we willen", en het is degene die standaard is geselecteerd. Als we met het gereedschap Pen zouden werken met dat pictogram geselecteerd, zouden we vormen tekenen, net alsof we een van de verschillende vormgereedschappen zouden gebruiken, behalve dat we in plaats van een vooraf gedefinieerde vorm zoals een rechthoek of een ellips te tekenen, kon elke vorm tekenen die we wilden. Zoals ik al zei, dat is niet wat we willen. We willen het pictogram ernaast, het pictogram Paden, dus ga je gang en klik erop om het te selecteren:

Tutorials voor Photoshop: Klik op het pictogram "Paden" in de optiebalk om met paden te werken met het gereedschap Pen.
Selecteer het gereedschap Pen en het pictogram Paden geselecteerd op de optiebalk en klik eenmaal ergens in uw document. Klik en sleep niet, klik gewoon. Wanneer u dit doet, voegt u een klein vierkant punt toe. Ik heb het hier vergroot:

Klik eenmaal in het document met het gereedschap Pen om een punt toe te voegen.
Dit eerste punt dat we zojuist hebben toegevoegd, is het startpunt van ons pad. Op dit moment hebben we eigenlijk geen pad. Alles wat we hebben is een startpunt. Het "punt" wordt technisch een anker of ankerpunt genoemd en het wordt genoemd omdat het het pad op zijn plaats verankert . Dit eerste punt verankert het begin van het pad naar deze plek in het document. Naarmate we meer punten toevoegen, verankert elk van hen het pad op zijn plaats op die locatie.
Laten we nog een punt toevoegen. Klik ergens anders in het document. Overal zal doen. Ik ga ergens rechts van mijn beginpunt klikken:

Tutorials voor Photoshop: Voeg een tweede ankerpunt toe door ergens anders in het document te klikken.
Ik heb nu een tweede ankerpunt toegevoegd en kijk wat er is gebeurd. Ik heb nu een rechte lijn die de twee punten met elkaar verbindt! Die rechte lijn is mijn pad. Zoals ik al eerder zei, hebben we minimaal twee punten nodig om een pad te maken, omdat we moeten weten waar het pad begint en waar het eindigt, en nu we zowel een begin- als een eindpunt hebben, kon Photoshop de twee punten samen, waardoor ons pad ontstaat.
Laten we voor de lol nog een paar punten toevoegen. Klik nog een paar keer op verschillende plaatsen in het document. Nogmaals, klik en sleep niet, klik gewoon:
Voeg extra punten toe door op verschillende plaatsen in het document te klikken.
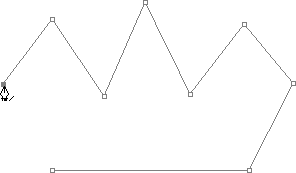
In de bovenstaande afbeelding heb ik nog zeven ankerpunten toegevoegd door op verschillende plaatsen te klikken met het gereedschap Pen en elke keer dat ik er een toevoegde, nam de lengte van mijn pad toe omdat een nieuw pad "segment" werd toegevoegd tussen het vorige punt en het nieuwe punt. Mijn pad bestaat nu uit negen ankerpunten en acht padsegmenten. Ik zou door kunnen blijven klikken in het document om meer ankerpunten en padsegmenten toe te voegen, maar wat ik nu echt zou willen doen, is mijn pad sluiten, zodat het een volledige vorm vormt.
Een pad sluiten
Om een pad te sluiten, hoeven we alleen nog maar op ons beginpunt te klikken. Wanneer u uw muiscursor over het startpunt beweegt, ziet u een kleine cirkel in de rechteronderhoek van het penpictogram:

Er verschijnt een kleine cirkel in de rechteronderhoek van het penpictogram wanneer u de cursor over het beginpunt van het pad beweegt.
Die cirkel vertelt ons dat we op het punt staan "volledige cirkel" met ons pad te komen en het af te maken waar het begon. Om het te sluiten, klikt u gewoon direct op het startpunt.
We kunnen hieronder zien dat mijn pad een gesloten pad is geworden en nu een basisoverzicht van een vorm is:
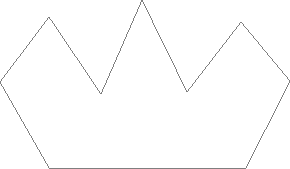
Het pad is nu gesloten, eindigt bij het startpunt en creëert een gesloten pad.
Hoewel dit pad alleen voor de lol is getekend als een voorbeeld van het tekenen van een basispad met het gereedschap Pen, kan ik dit pad eenvoudig omzetten in een selectie. Daarvoor hebben we het palet Paden van Photoshop nodig, en daar zullen we daarna naar kijken.
Een pad in een selectie veranderen
Tot nu toe hebben we gekeken naar wat een pad is en hoe we een basispad kunnen tekenen met de Pen Tool van Photoshop. Maar hoe maak je een keuze uit het pad?
Gemakkelijk! Er zijn een aantal manieren om van een pad een selectie te maken, inclusief een handige sneltoets, maar voordat we naar de snelle manier kijken, kijken we eerst naar de officiële manier. De "officiële manier" omvat het gebruik van het palet Paden van Photoshop, dat u gegroepeerd vindt in het palet Lagen en het palet Kanalen:
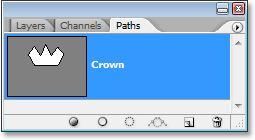
Padenpalet van Photoshop.
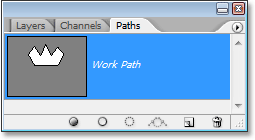
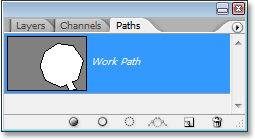
Op het eerste gezicht lijkt het palet Paden erg op het Lagen-palet van Photoshop, en Adobe heeft het opzettelijk zo gemaakt, zodat je je er comfortabeler bij voelt. We kunnen een miniatuurvoorbeeld zien van de vorm van het pad dat we zojuist hebben gemaakt, en standaard noemt Photoshop het pad "Werkpad", wat eigenlijk een chique manier is om "tijdelijk" te zeggen, alsof je een andere pad nu zonder dit pad eerst naar iets anders te hernoemen, dit zou worden vervangen door het nieuwe pad. U kunt slechts één "werkpad" hebben, dus als u het wilt behouden, moet u dubbelklikken op de naam in het palet Paden en het een andere naam geven voordat u een nieuw pad maakt.
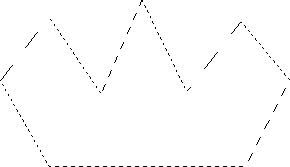
Omdat mijn pad een beetje op een kroon lijkt, ga ik dubbelklikken op de naam "Werkpad", die met het dialoogvenster Save Path van Photoshop verschijnt, en ik ga mijn pad "Crown" hernoemen:

U kunt een tijdelijk "werkpad" opslaan door het eenvoudig te hernoemen.
Ik klik op OK als ik klaar ben, en als ik opnieuw in mijn Paden-palet kijk, zie ik dat zeker genoeg, mijn "Werkpad" is hernoemd "Kroon":
Het palet Paden geeft aan dat het pad de naam 'Kroon' heeft gekregen.
Door het te hernoemen, is het pad nu opgeslagen en verdwijnt het niet van mij als ik een nieuw pad ga maken. Alle opgeslagen paden worden ook opgeslagen met het Photoshop-document, dus nu, als ik mijn document opsla, wordt het pad ermee opgeslagen en de volgende keer dat ik het document open, zal het pad er nog steeds in het palet Paden staan.
Een pad opslaan hoeft u niet te doen om er een selectie van te maken. In de meeste gevallen hoeft u het pad niet meer te gebruiken wanneer u het gereedschap Pen gebruikt om selecties te maken, dus hoeft u het niet op te slaan. Als je het echter wel wilt opslaan, hernoem het dan naar iets anders dan "Werkpad" en het is opgeslagen.
Als we het pad in een selectie veranderen, als we onderaan het palet Paden kijken, zien we verschillende pictogrammen. Met deze pictogrammen kunnen we verschillende dingen doen op onze weg. Het eerste pictogram aan de linkerkant is het pictogram Pad vullen met voorgrondkleur en, zoals de naam al aangeeft, door erop te klikken wordt ons pad gevuld met onze huidige voorgrondkleur. Interessant, maar dat is niet wat we willen. Het tweede pictogram van links is het pictogram Lijn met penseel, waarmee een lijn op ons pad wordt toegepast met de penseel die we momenteel hebben geselecteerd.
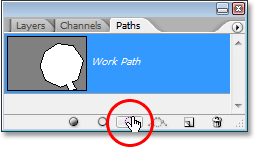
Dit is een geweldige manier om interessante effecten in Photoshop te creëren, maar voor wat we hier doen, een pad in een selectie veranderen, is het ook niet wat we willen. Degene die we willen is het derde pictogram van links, het pad Laden als een selectiepictogram:
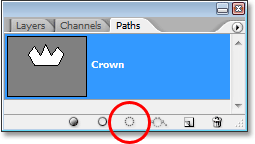
Het pictogram "Pad laden als selectie" onderaan het palet Paden.
Zodra ik op dit pictogram klik, wordt mijn pad in mijn document een selectie, alsof ik het had gemaakt met een van de meest gangbare selectietools van Photoshop:
Het pad is nu omgezet in een selectie.
Het is zo makkelijk! Het is zelfs nog eenvoudiger omdat er een sneltoets is om een pad in een selectie te veranderen zonder dat u helemaal hoeft te schakelen naar het palet Paden. Wanneer u uw pad hebt getekend en klaar bent om er een selectie van te maken, drukt u op Ctrl + Enter (Win) / Command + Return (Mac) om Photoshop het pad in een selectie te laten converteren.
Inmiddels is het misschien wat duidelijker voor u, hoewel het Pen-hulpmiddel een selectietool is, maar niet is gegroepeerd met de andere selectietools bovenaan het palet Tools. De reden is dat het gereedschap Pen voornamelijk een padtool is. Het maakt selecties door eerst paden te maken, en om die reden heeft het meer gemeen met de verschillende vormgereedschappen en het tekstgereedschap, die allemaal paden gebruiken, dan met de basisselectietools zoals het rechthoekige selectiekadergereedschap of de lasso Tool, die selecties maakt op basis van pixels.
Laten we eens kijken naar een praktisch voorbeeld van wat we tot nu toe hebben geleerd. Hier hebben we een foto van een stopbord voor enkele rotsachtige kliffen:

Een foto van een stopbord.
Laten we zeggen dat ik dat stopbord wilde selecteren, zodat ik het naar zijn eigen laag kon kopiëren. Het stopteken bestaat uit niets meer dan een reeks rechte lijnen, wat dit uiterst gemakkelijk gaat maken. Eerst heb ik een startpunt nodig voor mijn pad, dus begin ik in de linkerbovenhoek van het teken door eenmaal te klikken om een eerste ankerpunt te plaatsen. In dit geval maakt het niet echt uit waar ik het pad begin, maar ik begin in de linkerbovenhoek:
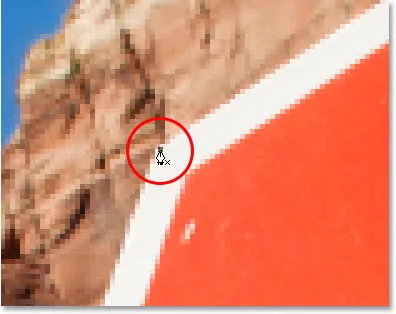
Klik eenmaal in de linkerbovenhoek van het stopteken om het pad te beginnen met een eerste ankerpunt.
Merk op hoe ik hier heb ingezoomd terwijl ik klik. U zult het gemakkelijker vinden bij het maken van selecties met het gereedschap Pen om een beetje in te zoomen op uw afbeelding. Op die manier weet je zeker dat je je pad net binnen het gebied houdt dat je wilt selecteren.
Op dit moment heb ik geen pad, ik heb alleen een startpunt voor mijn pad. Om het pad te maken, hoef ik alleen maar rond het bord te gaan en een ankerpunt toe te voegen in elke hoek waar het pad van richting moet veranderen. Terwijl ik elk ankerpunt toevoeg, verschijnt een nieuw padsegment dat het vorige ankerpunt met het nieuwe verbindt, totdat ik helemaal rond het teken ben gegaan. Om het pad te sluiten, klik ik gewoon terug op het oorspronkelijke startpunt. Het is een beetje moeilijk te zien in de onderstaande screenshot, maar ik heb nu een pad rond het hele stopteken, inclusief het bericht waaraan het is bevestigd, gewoon door rond te gaan klikken in de hoeken waar het pad van richting moet veranderen:

Er verschijnt nu een pad rondom het stopteken in de afbeelding.
Als ik nu in mijn Paden-palet kijk, zie ik heel duidelijk dat ik een pad heb in de vorm van het stopbord:
Het palet Paden van Photoshop toont het pad getekend rond het stopteken.
Merk op hoe Photoshop het pad "Werkpad" heeft genoemd, wat betekent dat dit pad tijdelijk is en ik verlies het als ik een ander pad maak zonder dit pad eerst op te slaan door het te hernoemen. Zelfs als ik geen nieuw pad maak, verlies ik het nog steeds als ik het document sluit, tenzij ik het eerst opsla. Ik hoef dit pad echter niet te bewaren, dus ik maak me er geen zorgen over. In de meeste gevallen hoeft u zich daar ook geen zorgen over te maken.
Om mijn pad om te zetten in een selectie, klik ik op het pad Laden als een selectiepictogram onderaan het palet Lagen, of ik kan net zo gemakkelijk op Ctrl + Enter (Win) / Command + Return (Mac) drukken:
Klik op het pictogram "Pad laden als selectie" in het palet Paden of druk op "Ctrl + Enter" (Win) / "Command + Delete" (Mac) om het pad om te zetten in een selectie.
Zodra ik dat doe, wordt mijn pad omgezet in een selectie en is het stopteken nu geselecteerd:

Het stopteken is nu geselecteerd na het converteren van het pad in een selectie.
Ik ga terug naar mijn lagenpalet en om het stopteken naar zijn eigen laag te kopiëren, gebruik ik de sneltoets Ctrl + J (Win) / Command + J (Mac), die het teken op zichzelf plaatst laag boven de achtergrondlaag:
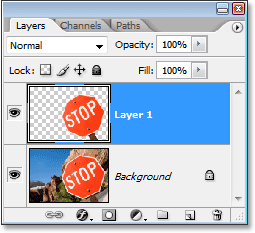
Het stopteken is nu naar zijn eigen afzonderlijke laag gekopieerd.
Met het teken nu op zijn eigen laag, kan ik doen wat ik wil, de achtergrond verwisselen met een andere afbeelding of de achtergrond zwart en wit maken terwijl het teken in kleur blijft, wat ik maar kan bedenken. Het punt is dat ik het teken gemakkelijk kon selecteren door in de hoeken te klikken met het gereedschap Pen, waardoor een pad rond het teken werd gemaakt, en vervolgens heb ik het pad eenvoudig omgezet in een selectie.
Tot nu toe hebben we in onze kijk op het maken van selecties met het gereedschap Pen in Photoshop geleerd dat de pen een selectietool is als de meer gebruikelijke selectietools van Photoshop zoals het rechthoekige selectiekader en de Lasso-gereedschappen, maar dat in plaats van op basis van selecties op pixels zoals die andere tools, tekent de Pen Tool paden die vervolgens gemakkelijk kunnen worden omgezet in selecties, hetzij vanuit het palet Paths of met behulp van de snelle sneltoets.
Daarom bevindt de pen zich niet bovenaan het palet Gereedschappen met die andere pixelgebaseerde selectiegereedschappen, maar is hij in plaats daarvan gegroepeerd in de padgereedschappen, zoals de verschillende vormgereedschappen, de tekstgereedschap en de padselectie- en directe selectiehulpmiddelen. . Het gereedschap Pen draait helemaal om paden, niet om pixels.
We hebben geleerd dat we ankerpunten in ons document kunnen toevoegen, die het pad op hun plaats verankeren, door eenvoudig op verschillende plaatsen te klikken met het gereedschap Pen, en naarmate we meer en meer ankerpunten toevoegen, maken we een pad als elk nieuw punt is verbonden met het vorige punt door een nieuw padsegment. We hebben ook geleerd dat een pad is wat meestal wordt aangeduid als een 'niet-afdrukelement', wat betekent dat ongeacht het aantal paden dat we toevoegen, geen enkele zichtbaar zal zijn op het papier wanneer we de afbeelding gaan afdrukken . Ze zijn ook niet zichtbaar als we de afbeelding op een website weergeven. Paden zijn alleen zichtbaar voor ons wanneer we in Photoshop werken (hoewel andere programma's zoals Adobe Illustrator ook paden ondersteunen). Pas als we iets met het pad doen, zoals het met een kleur vullen, er een lijn op toepassen of het in een selectie omzetten, wordt het pad iets meer dan alleen een eenvoudige, niet-afdrukbare omtrek van een vorm.
We zagen hoe gemakkelijk het zou zijn om het gereedschap Pen te gebruiken om zoiets als een stopbord te selecteren door het uit te lijnen met een pad dat bestaat uit een reeks rechte wegsegmenten en het pad vervolgens in een selectie te veranderen. Dat is geweldig, maar echt, we hebben nog niets gedaan dat we niet eenvoudiger hadden kunnen doen met zoiets als de Lasso-tool, of nog beter, de Polygonal Lasso-tool die speciaal is gebouwd voor het selecteren van platte vormen zoals onze stop teken. De kans is groot dat, tenzij je een vreemde fascinatie hebt voor verkeersborden, je vroeg of laat iets wilt kiezen dat een beetje interessanter is, en met "interessant" bedoel ik meer uitdagend. En met "uitdagen" bedoel ik iets dat bochten bevat. Het selecteren van een gebogen object in Photoshop is meestal wanneer u merkt dat u alle respect voor de basisselectietools verliest. Gelukkig is het ook het moment waarop de Pen Tool echt schijnt!
Voordat we verder gaan, moet ik erop wijzen dat alles wat we tot nu toe hebben gedaan vrij eenvoudig is geweest. Klik hier, klik daar, converteer het pad naar een selectie, klaar. Dit volgende deel waar we in het tekenen van curven gaan, is niet zo eenvoudig, hoewel het zeker niet moeilijk is, maar als dit je eerste keer is met het gereedschap Pen of je hebt er niet veel ervaring mee, lijkt het werken met curven een beetje onnatuurlijk en zelfs een beetje overweldigend. Dit is absoluut waar de analogie "rijden op de fiets" van pas komt. Je kunt in het begin een paar keer vallen en je afvragen hoe iemand het voor elkaar krijgt, maar hoe meer je oefent en hoe meer je eraan vasthoudt, hoe gevoeliger het allemaal begint te maken. Binnen de kortste keren lijkt het je een tweede natuur en je zult opeens begrijpen waarom zoveel mensen zweren dat de Pen-tool de beste selectie-tool in heel Photoshop is! Serieus, echt waar.
Een handvat krijgen op richtinggrepen
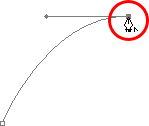
Laten we opnieuw beginnen met het gereedschap Pen. Open een nieuw leeg Photoshop-document of verwijder eenvoudig wat u tot nu toe in het bestaande document hebt gedaan, zodat we opnieuw beginnen. Klik vervolgens met het gereedschap Pen geselecteerd en de optie Paden op de optiebalk (onthoud, dit is standaard de optie Vormlagen, dus u moet ervoor zorgen dat u de optie Paden hebt geselecteerd), klik eenmaal ergens in uw document, net zoals we deden eerder. Deze keer echter, in plaats van alleen maar te klikken om een ankerpunt toe te voegen, klik en sleep je muis vervolgens een korte afstand van het ankerpunt voordat je je muisknop loslaat:
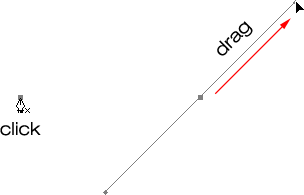
Klik ergens in het document met het gereedschap Pen en sleep vervolgens een korte afstand van het ankerpunt.
Wanneer u klaar bent, ziet u een ankerpunt met twee lijnen die zich ervan uitstrekken. Op het eerste gezicht denk je misschien dat we er op de een of andere manier in zijn geslaagd om een pad te slepen met het gereedschap Pen. Het lijkt er immers op dat we drie ankerpunten hebben, één aan beide uiteinden en één in het midden, met twee baansegmenten die ze verbinden. Als we echter wat dichterbij kijken, kunnen we zien dat de punten aan beide uiteinden een beetje kleiner zijn dan die in het midden, en dat ze eigenlijk een andere vorm hebben. Die in het midden is vierkant, en zoals we hebben gezien, is een ankerpunt vierkant, maar die aan beide uiteinden lijken ruitvormig te zijn. Zijn sommige ankerpunten vierkant en sommige ruitvormig?
Nee. Alle ankerpunten zijn vierkant en ze zijn allemaal even groot, wat betekent dat die kleinere, ruitvormige punten aan de uiteinden geen ankerpunten zijn. En als het geen ankerpunten zijn, betekent dit dat de lijnen geen padsegmenten zijn, omdat we ten minste twee ankerpunten nodig hebben om een pad te maken en op dit moment is het enige ankerpunt dat we in het midden hebben. Dus wat zijn precies die lijnen dan die zich uitstrekken vanaf het ankerpunt? Het zijn richtingshandgrepen!
"Ah, richting handgrepen!" jij zegt. "Nu snap ik het!"
… … …………….
"Wacht, nee ik niet. Wat zijn in hemelsnaam richtingshandgrepen?"
Richtingshandgrepen zijn, nou ja, handgrepen, en ze worden alleen gebruikt bij het maken van gebogen padsegmenten. Er zijn geen richtinggrepen nodig bij het maken van rechte wegsegmenten. Meestal zijn er twee, hoewel er soms maar één is, en zoals we al hebben gezien, steken ze uit ankerpunten. Ze worden "handvatten" genoemd omdat, zoals we zo dadelijk zullen zien, je ze daadwerkelijk kunt pakken en verplaatsen.
Richtinghandgrepen regelen twee dingen. Ze bepalen de hoek van de curve, en ze bepalen de lengte van de curve, en ze doen het op een heel nette manier. De reden dat er meestal twee zijn, is omdat een van hen de hoek en lengte bepaalt van de curve die in het ankerpunt komt, en de andere de hoek en lengte van de curve die uit het ankerpunt stroomt.
Voordat we kijken hoe we krommen kunnen tekenen met de richtinggrepen, laten we eerst kijken hoe we de handgrepen zelf kunnen besturen, omdat ons succes met het tekenen van curven veel zal afhangen van ons vermogen om de handgrepen te bedienen. Maak je geen zorgen, het is geen, zoals ze zeggen, rocket science. Er zijn slechts enkele eenvoudige dingen die u moet leren. We hebben al gezien hoe u richtingshandgrepen kunt maken, door te klikken met het gereedschap Pen en vervolgens weg te slepen van het ankerpunt. Hoe verder weg van het ankerpunt dat we slepen, hoe langer de richtinghandgrepen zullen zijn. Hoe langer de hendel, hoe langer de curve. Korte steel, korte bocht. Lange steel, lange bocht.
Een van de leuke dingen die je vrij snel leert over de Pen Tool is dat het buitengewoon vergevingsgezind is. Er is helemaal geen reden om ons zorgen te maken om de dingen de eerste keer goed te krijgen wanneer we er paden mee tekenen, omdat we terug kunnen gaan en dingen gemakkelijk kunnen oplossen als we klaar zijn! Heb je een ankerpunt op de verkeerde plek geplaatst? Geen probleem! Verplaats het gewoon waar je het nodig hebt! We zullen zien hoe we dat zo doen. Heb je een richtinggreep in de verkeerde richting getrokken? Geen probleem. Pak de hendel en draai deze in de richting die u nodig hebt. Nogmaals, we zullen zien hoe dat te doen. Is een van uw richtingshendels te lang of te kort? Helemaal geen probleem. Klik erop en sleep hem indien nodig langer of korter (ja, we gaan kijken hoe we dat ook kunnen doen). Paden zijn te allen tijde volledig bewerkbaar, dus er is absoluut geen reden om je zorgen te maken over het maken van een fout of om het de eerste keer goed te maken. Voelt u zich daardoor niet al een beetje beter?
Draairichting handgrepen roteren en vergroten of verkleinen
Zoals ik al zei, ze worden richting "handgrepen" genoemd omdat je ze als handgrepen kunt pakken en verplaatsen. Laten we kijken hoe we dat kunnen doen. Eerst zullen we kijken hoe we beide hendels tegelijkertijd kunnen roteren. Houd uw Ctrl-toets (Win) / Command (Mac) ingedrukt met behulp van het ankerpunt en de twee richtingshandgrepen die we al hebben gemaakt. U ziet het pictogram van het gereedschap Pen tijdelijk veranderen in het pictogram Direct selecteren (de witte pijl), en dat komt omdat met het gereedschap Pen geselecteerd, het vasthouden van "Ctrl / Command" een snelle snelkoppeling wordt voor het tijdelijk openen van het gereedschap Direct selecteren wat we gebruiken om verschillende delen van ons pad te selecteren. Klik vervolgens direct op de kleine ruitvorm aan het einde van een van de richtingshandgrepen (klikken op de "lijn" zelf werkt niet, dus u moet altijd op de ruitvorm aan het einde van een greep klikken om iets te doen ) en sleep het rond het ankerpunt om het te roteren. Terwijl u een van de handgrepen draait, roteert de andere handgreep mee in de tegenovergestelde richting, een beetje als een wip. Het zal je ook opvallen dat zodra je de hendel begint te slepen, je muiscursorpictogram opnieuw zal veranderen, dit keer in het pictogram Verplaatsingsgereedschap, omdat we iets van de ene plek naar de andere verplaatsen:
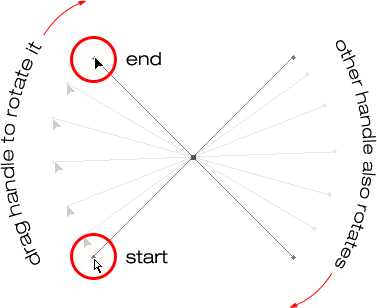
Houd "Ctrl" (Win) / "Command" (Mac) ingedrukt en klik op het uiteinde van een van de richtingshandgrepen, sleep vervolgens de greep om deze rond het ankerpunt te draaien. Terwijl u één hendel sleept, roteert de andere in de tegenovergestelde richting.
U kunt uw "Ctrl / Command" -toets loslaten zodra u bent begonnen met het slepen van de handgreep. Het is niet nodig om het de hele tijd laag te houden.
Als u het formaat van een richtinggreep wilt wijzigen terwijl u deze draait, sleept u eenvoudig het uiteinde van de handgreep naar het ankerpunt om het korter te maken of sleept u het weg van het ankerpunt om het langer te maken. Zoals ik hierboven al zei, zal een kortere hendel de curve korter maken en een langere hendel zal de curve langer maken. U kunt echter niet beide handgrepen tegelijkertijd van formaat veranderen, dus als u beide formaat moet wijzigen, moet u elk afzonderlijk langer of korter slepen. Het enige dat je beide tegelijk kunt doen, is ze roteren. Als je je muisknop al hebt losgelaten na het draaien van de handgrepen en de cursor weer is veranderd in het pictogram Pen Tool en je de grootte van een van de handgrepen moet wijzigen, moet je "Ctrl / Command" nogmaals ingedrukt houden om tijdelijk schakel terug naar het gereedschap Direct selecteren en klik en sleep vervolgens het uiteinde van de greep om het formaat te wijzigen:
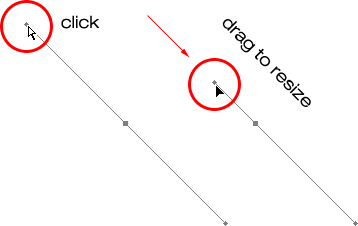
Sleep de uiteinden van de handgrepen naar het ankerpunt om ze in te korten of sleep ze weg van het ankerpunt om ze langer te maken.
Laten we nu kijken hoe we de handgrepen onafhankelijk van elkaar kunnen draaien. To rotate one handle without affecting the other one, first release your mouse button if you've been rotating or resizing the handles so your cursor changes back into the Pen Tool icon. Then, instead of holding down "Ctrl/Command", which moves both handles at once, hold down your Alt (Win) / Option (Mac) key and click on the end of either of the direction handles. You'll see your cursor change into the Convert Point Tool icon, which looks like a simplified arrow made of only two lines, almost like an upside down letter "v" (except that it's not quite upside down). Then, simply drag the handle around the anchor point to rotate it, just as you did before, and this time, the handle will rotate independently of the other one, breaking the connection between them:
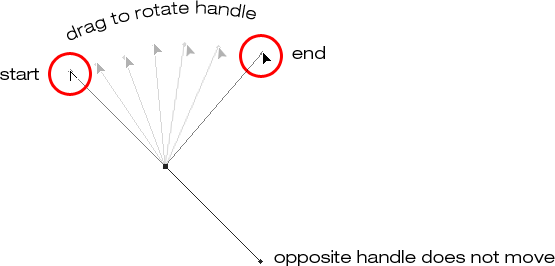
Hold down "Alt" (Win) / "Option" (Mac) and click on the end of either of the direction handles, then drag the handle to rotate it around the anchor point independently of the other handle.
Again, you can release your "Alt/Option" key after you've started dragging. You don't have to hold it down the whole time.
You can also resize direction handles using the "Alt/Option" key in exactly the same way as you can with the "Ctrl/Command" key. If you're in the process of rotating a handle, simply drag it in towards the anchor point to make it shorter or away from the anchor point to make it longer. If you've already released your mouse button and your cursor is showing the Pen Tool icon again, you'll need to hold down "Alt/Option" once again, then click on the end of the handle and drag it to resize it.
Is there a difference between resizing the handles using "Ctrl/Command" and using "Alt/Option" to do it? Yes there is. If you haven't yet "broken the connection" between the handles by dragging one independently of the other, resizing a handle using "Ctrl/Command" will keep the handles connected together. It won't resize both handles at once, but it won't break the connection between them either so you'll still be able to rotate them together if you need to. If you resize a handle using "Alt/Option", you'll break the connection between the handles. Even if you don't rotate the handle as you're resizing it, the connection will still be broken.
What if you've broken the connection between the handles by rotating them using "Alt/Option" and then want to rotate them together again? Can you "rebuild the connection", so-to-speak, by selecting one of them while holding down "Ctrl/Command" as before? Good question, and the answer is no. Once you've broken the connection between the handles, the "Ctrl/Command" key on its own won't bring it back. You'll need to select one of the handles while holding Ctrl+Alt (Win) / Command+Option (Mac) at that point in order to move the handles together again.
Quick Summary So Far …
We've covered a lot of information here about working with direction handles, so before we move on and start drawing some actual curves, let's do a quick recap:
- To add an anchor point, simply click with the Pen Tool.
- To add an anchor point with direction handles extending out from it, click with the Pen Tool, then drag away from the anchor point before releasing your mouse button. The further you drag, the longer the direction handles will be.
- To rotate the direction handles together, hold down Ctrl (Win) / Command (Mac), which will temporarily switch you to the Direct Selection Tool, then click on the end of either handle and drag it around the anchor point. The other handle will rotate in the opposite direction.
- To rotate the direction handles independently, hold down Alt (Win) / Option (Mac), which will temporarily switch you to the Convert Point Tool, then click on the end of either handle and drag it around the anchor point. The other handle will not rotate.
- To resize handles without breaking the connection between them, hold down Ctrl (Win) / Command (Mac) to switch to the Direct Selection Tool, then click on the end of either handle. Drag it towards the anchor point to make it shorter, or drag it away from the anchor point to make it longer.
- To resize handles and break the connection between them, hold down Alt (Win) / Option (Mac) to switch to the Convert Point Tool, then click on the end of either handle. Drag it towards the anchor point to make it shorter, or drag it away from the anchor point to make it longer.
- To rotate the direction handles together after breaking the connection, hold down Ctrl+Alt (Win) / Command+Option (Mac), then click on the end of either handle and drag it around the anchor point. The other handle will once again rotate with it.
Okay, that pretty much covers the basics of how to control the direction handles. Let's see how we can use them to draw some curves!
We've covered a lot of ground so far. We know about anchor points and direction handles. We know that in order to draw straight path segments, all we need to do is lay down a series of anchor points wherever we need them simply by clicking with the Pen Tool, and as we add more and more anchor points, we add more straight sections to our path. We know how to create direction handles and how to rotate them, either together or separately, and how to resize them.
We know how to turn a path into a selection by clicking on the "Load path as selection" icon at the bottom of the Paths palette or by simply pressing "Ctrl+Enter" (Win) / "Command+Return" (Mac) on the keyboard. One thing I didn't mention yet is that regardless of whether our path consists of straight lines,
curves, or a combination of straight lines and curves, converting it into a selection is done exactly the same way, and we've already learned how to do it, which means we're well on our way to mastering making selections with the pen! All we need to do is get a bit of practice drawing curves, which is exactly what we're about to do!
Nog steeds aan het scrollen? Download deze tutorial als PDF!
Drawing A Curve
Let's once again start fresh, either by opening up a new blank document in Photoshop or by deleting what you've already done. We're going to draw our first curve so we can put all of our newly-aquired direction handle knowledge to use. First, with the Pen Tool selected and the Paths option selected in the Options Bar, click once somewhere in your document to add an anchor point. Just click, don't click and drag. You should have one single anchor point on the screen when you're done.
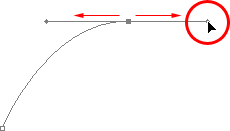
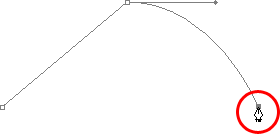
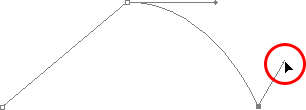
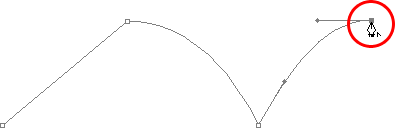
Then, move your mouse cursor up and to the right of your initial anchor point. Click again to add a second anchor point, but this time, drag your mouse a little to the right of the anchor point to drag out direction handles. Hold down Shift as you drag to constrain your movement to a horizontal direction. As you drag out the direction handles, you'll see your path appearing as a curve between the two anchor points! The further you drag your mouse, the longer you make the direction handles, and the more of a curve you create:
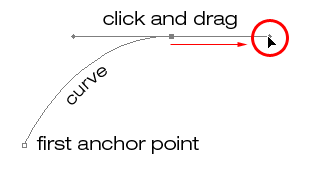
Click once to add an anchor point, then click and drag out a second anchor point with direction handles, creating a curved path segment between the two points.
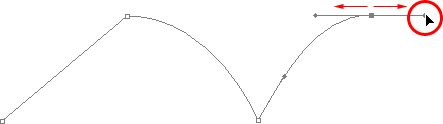
Click down and to the right of the second anchor point to add a third anchor point. This time, don't click and drag, just click:
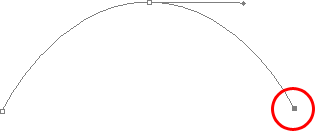
Add a third anchor point down and to the right of the second one by clicking with the Pen Tool.
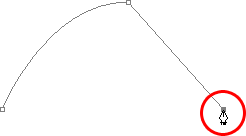
As soon as you add the third anchor point, a second path segment will appear, joining the second anchor point with the third one. And because our second anchor point has direction handles extending from it, this new path segment is also curved! We now have a nice, smooth arc starting from the first point on the left, then passing through the anchor point with the direction handles up top, and coming to an end at the third point.
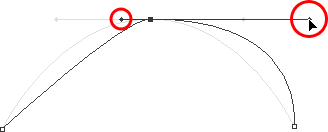
One thing you may have noticed, and you can see it in the screenshot above, is that when you added the third anchor point, the direction handle extending out the left side of the second anchor point disappeared. It's still there, Photoshop simply hid it from view. To see it again, use the keyboard shortcut we've already learned to temporarily switch to the Direct Selection Tool, which is by holding down the Ctrl (Win) / Command (Mac) key, and then click on the second anchor point to select it. As soon as you do, the missing direction handle reappears as if it was there the whole time (which it was):

Hold down the "Ctrl" (Win) / "Command" (Mac) key to temporarily switch to the Direct Selection Tool, then click on the top anchor point to select it. The missing anchor point reappears.
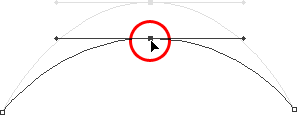
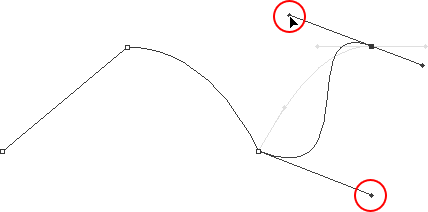
With your "Ctrl/Command" key still held down so you still have access to the Direct Selection Tool, try resizing each direction handle by clicking on the end of each one to select it and then dragging it towards and away from its anchor point. Again, hold "Shift" as you drag to constrain your movement horizontally, and watch what happens. As you increase the length of a handle, you get more of a curve, and as you decrease its length, you get less of a curve. Also notice that each handle controls its own side of the curve. The handle on the left controls the curve coming into the anchor point from the left, and the handle on the right controls the curve flowing out from the anchor point on the right.
Here, I've made my handle on the left shorter, and as we can see, there's much less of a curve now than there was originally, almost becoming a straight line. I've also made the handle on the right longer, and as a result, the curve on the right is now much more pronounced. The faint curve is the original for comparison:
Change the shape of the curves by resizing the direction handles. The left handle controls the left curve, and the right handle controls the right curve.
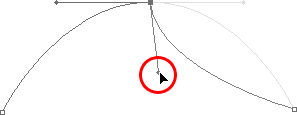
I'm going to undo my changes by pressing Ctrl+Alt+Z (Win) / Command+Option+Z (Mac) a couple of times to set my direction handles back to their original sizes so they're equal length once again. Now let's try rotating the handles. Hold down "Ctrl/Command" once again to access the Direct Selection Tool, then click on the end of either handle to select it and try rotating it around the anchor point. Since we selected the handle with "Ctrl/Command", both handles rotate together. Here I've dragged my left handle down and to the right, and the angle of the curve on the left changed along with it, now appearing as more of a slope as it rises up towards the anchor point. By dragging the left handle down and to the right, I caused the right handle to rotate up and to the left, and again, the angle of the curve on the right changed along with it, now rising above the anchor point briefly before making a steep decent down to the anchor point on the right. Again, the faint curve is the original for comparison:
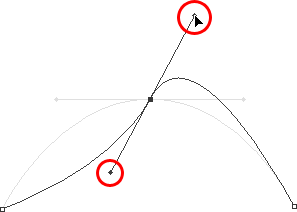
Rotate the direction handles to change the angle of the curves. Select a handle while holding "Ctrl" (Win) / "Command" (Mac) to rotate both handles together.
The Dreaded "Loop"
One thing you want to avoid is rotating the handles too far, which will cause your path segments to overlap and create loops. Here, I've rotated my handles all the way around so that the left handle is now on the right and the right handle is on the left, and notice what's happened. My path segments are now overlapping each other, creating a loop:
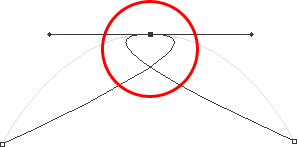
Rotating the direction handles too far causes the path segments to overlap, creating an unwanted loop in the path.
Loops can be caused by rotating the direction handles too far, as I've done above, but more often than not, they're caused by a handle being too long, making the curve too long and causing it to overlap with itself. If that happens, which it does sometimes as you're drawing a path, simply shorten the length of the direction handle. Most people end up creating a whole bunch of loops in their path when they first start working with the Pen Tool, so don't think you're the only one. No need to panic or become frustrated though. As I said, the problem is most likely being caused by a direction handle being too long, and all you need to do is shorten the handle to "un loop" the loop!
I'm going to press Ctrl+Alt+Z (Win) / Command+Option+Z (Mac) a few times once again to undo my changes and reset my path back to the nice smooth arc I started with. Now, what about rotating the direction handles independently of each other? As we learned on the previous page, to rotate the handles separately, instead of selecting them with "Ctrl/Command", we simply select them while holding down Alt (Win) / Option (Mac), which gives us temporary access to the Convert Point Tool. Click on the end of a handle to select it, then drag it with your mouse to rotate it and this time, the other handle will stay in place, breaking the connection between them.
Here, I've selected the handle on the right while holding "Alt/Option" and then rotated it down and to the left. Notice how once again, the angle of the path segment on the right changes to match the new direction of the handle, and this time, the handle on the left, along with the path segment on the left, both stay in place. My path now looks a bit like a shark fin:
Hold down "Alt" (Win) / "Option" (Mac) to temporarily access the "Convert Point Tool", then click on the end of a direction handle to select it and rotate it independently of the other handle.
Moving An Anchor Point
One thing we haven't looked at yet is how to move an anchor point. If you recall, I mentioned on the previous page that the Pen Tool is extremely forgiving, and one of the reasons for it, besides being able to rotate and resize our direction handles after we've created them, is that we can easily move anchor points from one spot to another if we need to. As we've already learned, anchor points anchor a path into place. The anchor points themselves, however, are not anchored into place. You can move an anchor point anywhere, anytime, and any path segments that are connected to it will move and adjust right along with it.
To move an anchor point, hold down Ctrl (Win) / Command (Mac) to temporarily access the Direct Selection Tool as we've already been doing, then simply click on the anchor point to select it and drag it to its new location with your mouse. Any path segments connected to it will move with it to the new location. Here, I've dragged my middle anchor point down a bit from its original location (again, the faint path marks the original location for comparison). Notice how the path itself has changed shape to adjust to the new location of the anchor point:
Hold down "Ctrl" (Win) / "Command" (Mac) and click on an anchor point to select it, then drag it to a new location. Any path segments connected to the point will move with it, changing shape as needed.
Normally, when outlining an object with a path to select it using the Pen Tool, you won't need to move to an anchor point quite as far as what I've done above, but it's very common to go back around your path after you've created it and nudge a few anchor points here and there to fine-tune the path. Once you've selected an anchor point, you can nudge it up, down, left or right using the arrow keys on your keyboard.
Combining Straight Paths With Curves
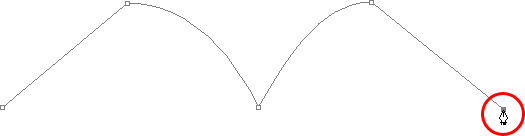
What if I didn't want both of my path segments to be curves? What if what I needed was for the first path segment to be curved, but the second one needed to be straight? Laten we kijken hoe we dat kunnen doen. I'm going to delete my existing path and start over again. First, I'll click to add an anchor point to start things off. Then, just as before, I'll click to add a second anchor point up and to the right of my initial point, and this time, I'll drag out direction handles, which will create a curved path connecting the two points, giving me exactly what I had way up at the start of this page:
Click once to add an anchor point, then click to add a second anchor point and drag out direction handles to create a curve.
I now have my initial curve, but I want my next path segment to be straight. If I was to simply click somewhere to add another anchor point right now, I would get another curve because I have that direction handle extending out from the right side of the last anchor point I added. What I need to do is get rid of that one direction handle. Without a direction handle controlling the angle and length of a curve, we get a straight line.
To remove the handle, leaving only the handle on the left of the anchor point, all I need to do is hold down Alt (Win) / Option (Mac), which will again temporarily switch me to the Convert Point Tool, and then I just click directly on the anchor point. When I do, the direction handle on the right disappears, leaving only the one on the left:
Hold down "Alt" (Win) / "Option" (Mac) and click directly on the anchor point to remove the direction handle on the right, leaving only the one on the left.
Now, with the direction handle gone, if I click to add a new anchor point, I get a straight path segment between the two points :
With the direction handle on the right now gone, clicking to add a new anchor point adds a straight path segment between the two points.
I now have a curved path segment on the left and a straight one on the right! What if I wanted the exact opposite? Suppose I needed to start with a straight path segment and then follow it with a curve? To do that, first I'll start by clicking to add an initial anchor point. Then, since I want a straight path segment, all I need to do is click somewhere else to add a second anchor point, and I automatically get a straight path connecting the two points:
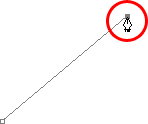
Click with the Pen Tool to add an initial anchor point, then click again somewhere else to add a second anchor point and create a straight path segment between them.
I'm going to keep my mouse button held down after clicking to add my second anchor point because I want my next path segment to be curved, and we know that in order to create a curve, we need a direction handle. To add a handle extending out from the right of my anchor point, I'm going to hold down Alt (Win) / Option (Mac), and with my mouse button still down, I'm simply going to to drag to the right of the anchor point. As I do, a direction handle will drag out along with it:
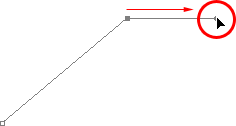
Hold down "Alt" (Win) / "Option" (Mac) and drag out a direction handle on the right of the anchor point.
Notice that the direction handle extended only from the right of the anchor point, not from both sides, leaving my straight path segment on the left in place. And now that I have my direction handle on the right, all I need to do to create my curve is click to add a third point:
Click to add a third anchor point, which creates a curved path segment between the previous anchor point and the new one.
And there we go! I now have a straight path segment on the left, followed by a curved segment on the right. Of course, most paths you draw are going to consist of more than just three anchor points. Let's say I wanted to continue this path, moving in the same general direction towards the right, and I want my next path segment to be curved as well. Just as I did a moment ago, I would leave my mouse button held down after clicking to add my third point. I would hold down Alt (Win) / Option (Mac) and I would drag out another direction handle. So far, we've only been dragging handles out towards the right, but what you really want to do is drag your handles out in the general direction you want the curve to follow. I want to create a curve that goes up and to the right, so I'm going to drag out a small handle in that same general direction:
Drag out your direction handles in the general direction of the curve.
Tip! A good practice to get into is to keep your direction handles small when first dragging them out, since you never really know how long or at what exact angle they need to be until the actual curve appears, and the curve doesn't appear until you've added both of its anchor points. Once you've added both points and the curve appears, you can easily go back and make any adjustments you need to the handles. You may even want to wait until you've drawn the entire path before worrying about adjusting the handles.
With my direction handle created, I'm going to click to add a fourth anchor point, and I'm going to drag out direction handles from it as well:
Adding a fourth anchor point along with direction handles extending from it.
I now have a third segment added to my path, this one being a curve. Notice that this curve actually has two direction handles controlling it, one extending from the right of my third anchor point and one extending from the left of my fourth point:

The third path segment now has two direction handles, one on either end, working together to control the curve.
The overall shape of this curve is now being controlled by the length and direction of both of these handles. Watch what happens to the curve when I move the handles. I'll drag the bottom handle down and to the right, and I'll drag the top handle up and to the left. I'll also drag both of these handles longer. The faint curve is the original for comparison:
Changing the direction and/or length of either handle changes the overall shape of the curve. After rotating and lengthening both handles, the curve now appears in an "S" shape.
The curve is now a bit "S" shaped, and that's because the bottom handle is controlling the angle and length of the curve as it flows out from the third anchor point, while the top handle is controlling the angle and length of the curve as it flows into the fourth point. Changing the length and/or direction of either handle will change the overall shape of the curve.
I'm going to press Ctrl+Alt+Z (Win) / Command+Option+Z (Mac) a couple of times to undo the changes I made, so the curve is once again in a simple arc shape as it was a moment ago, and I think I'll finish off this path with another straight segment, which means I'll need to remove that direction handle extending out from the right side of the fourth anchor point. We've already learned how to do that, by holding down Alt (Win) / Option (Mac) and clicking directly on the anchor point itself:
Hold down "Alt" (Win) / "Option" (Mac) and click directly on the anchor point to remove the direction handle on the right.
With the direction handle gone, all I need to do now to add a straight path segment is click to add another anchor point:
The direction handle on the right is now gone, so we can add a straight path segment simply by clicking to add another anchor point.
We could continue this path for as long as we wanted, adding more straight segments and curves, but I think we'll stop here because we've pretty much covered everything we need to know about drawing paths with the Pen Tool at this point. That was a lot of information to take in, especially if this is your first time learning about paths. As I mentioned at the beginning, you won't become a Pen Master simply by reading through this tutorial, just as you won't learn how to ride a bike, or drive a car, learn to swim, or play the piano simply by reading about it. But hopefully you have some sense at this point of how to draw paths with the Pen Tool, how to draw straight path segments, how to draw curves by dragging out direction handles, how to change the length and angle of the curve by rotating and resizing the handles, and how to combine straight and curved segments in a path.
To finish off our look at making selections with the Pen Tool, let's see a practical example of how to select an object with curves.
Here, we have a photo of a couple of dolphins leaping out of the water. Definitely a couple of very curvy creatures:

A photo of two dolphins jumping out of the water.
Let's say we want to select these dolphins so we can use them for a design or a collage, or whatever the case may be. If you were to try selecting them with the Lasso Tool, which is most likely what you would end up using if you didn't know how to use the Pen Tool, not only would you have a tough time, you'd have an even tougher time trying to convince yourself that you were happy with the results when you were done. The reason is because the Lasso Tool simply isn't capable of making curved selections very well. The biggest problem with it, besides being a pixel-based selection tool, is that it relies on you having a steady enough hand to move it smoothly around the curves. Even if you don't suffer from a caffeine addiction, you could drive yourself crazy trying to draw a perfectly smooth curve with your mouse, or even with a pen tablet, and when you've finally given up, you'll still be left with a selection full of rough, jagged edges that just scream "amateur!". No one likes to be called an amateur, especially when there's no need for it thanks to the Pen Tool!
Examine The Object First
Whenever you're about to select something with the Pen Tool, before you begin, take a moment to examine the object carefully to get a sense of where you're going to need to place your anchor points. Forget about all the details in the object and focus only on its shape. Where are the areas where the shape changes direction? Which parts of the shape are straight? Which parts are curved? If there's a curve, is it a smooth, continuous arc or does the angle change at a spot along the curve? Visualize in your mind where you're going to need to place your anchor points, because when you place one, you always want to be thinking about the next one and what the path segment between the two points needs to look like.
A Tool Of Elegance
One more thing to keep in mind is that the Pen Tool is meant to be a tool of elegance . It's not a nail gun or a staple gun. You don't want to just go clicking around your shape adding anchor points all "willy nilly" (that's a technical term). When using it to draw curves, you want those curves to be nice and smooth, otherwise we might as well just stick with the Lasso Tool. To keep the curves flowing smoothly, we need to limit the number of anchor points we use to create them. That's why you want to take a moment to examine the object first and visualize where the anchor points need to be. If you can outline a large section of the shape using only one curve with an anchor point on either end, that's what you want to do, because that's what's going to give you the kind of results you're looking for. The kind of results that scream "definitely not an amateur!".
Let's select these dolphins. I'm going to start my path in the middle of the photo, at the spot where the side of the dolphin on the left overlaps the rear flipper of the dolphin on the right. There's no right or wrong place to begin a path. This is just where I've decided to start. The first part of that rear flipper is straight, so since I don't need a direction handle to create a straight path segment, I'm simply going to click once with my Pen Tool to add my first anchor point, which will serve as the starting point for my path:
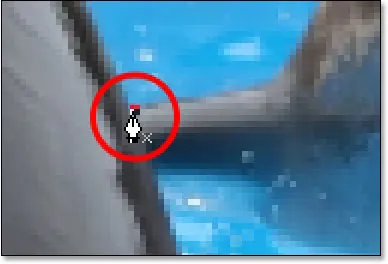
Adding the first anchor point.
As I mentioned earlier, you'll probably find it helpful to zoom in on your image as you're drawing your path. To scroll the image around on the screen as you're zoomed in, hold down the spacebar, which will switch you temporarily to the Hand Tool and allow you to move the image around on the screen by clicking and dragging it.
The top of that flipper actually has a slight curve to it as it approaches the dolphin's tail section, so for my second anchor point, I'm going to click at the point where the flipper and tail section meet, and I'm going to drag out short direction handles, dragging up and to the right in the direction that the tail section is moving. Notice that I've now created a slight curve along the flipper:
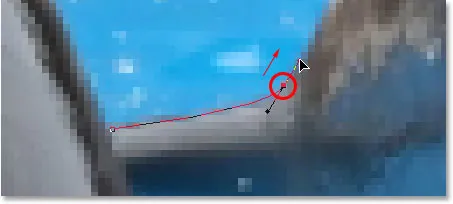
Adding the second anchor point and dragging out small direction handles to add a slight curve to the first path segment.
As I continue up along the tail, I can see that it stays straight for a short distance, followed by a curve to the right, so I'm going to click to add a third anchor point at the spot where the curve begins. This gives me a straight path segment between the previous point and the new one. I know there's a short direction handle extending out from the previous anchor point, which normally means that my new path segment will be a curve, not a straight section, but because the handle is so short and is also moving in the same direction as the path segment, there is no noticeable curve to it. Consider it a "mostly straight" path segment:
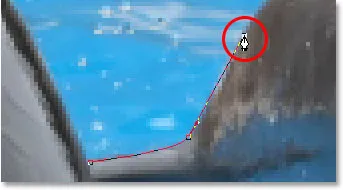
Clicking to add the third anchor point, creating a (mostly) straight path segment.
Continuing along, we come to the first real curve in our path. For this, I'm going to need to drag out a direction handle from the anchor point I just added, so I'm going to hold down Alt (Win) / Option (Mac), then drag out a handle in the general direction where I want the curve to flow as it starts. Notice how I'm only dragging out a handle from the one side of the anchor point, not both:
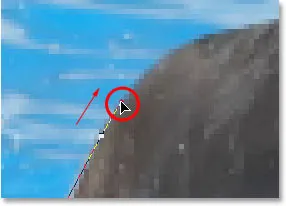
Hold "Alt" (Win) / "Option" (Mac) to drag out a direction handle from one side of an anchor point.
To add the curve, I'll click and drag at the spot where the curve ends, shaping the curve as I drag out the handles until it matches the curve of the dolphin's tail. If I needed to, I could also go back and change the length and direction of the handle at the start of the curve to fine-tune it, but in this case, I don't need to do that:
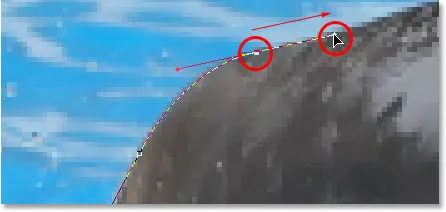
Adding an anchor point at the opposite end of the curve and dragging out direction handles from it, rotating and resizing them as needed until the curve matches the curve of the object.
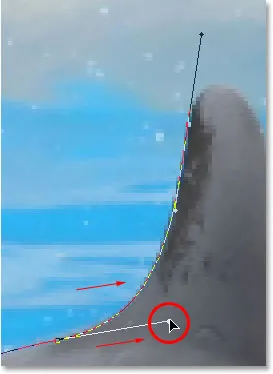
The next area of the dolphin is pretty straight, right up until its back begins to merge with its dorsal fin, at which point there's another curve, so I'm going to click to add an anchor point just before the curve up the dorsal fin begins, which is going to give me another "mostly straight" path segment between the previous point and the new point. Then I'm going to once again hold down Alt (Win) / Option (Mac) and drag out a direction handle as I prepare for my next path segment which will be curved:
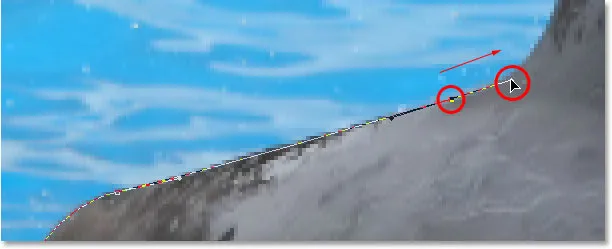
Click to add an anchor point, then hold down "Alt" (Win) / "Option" (Mac) and drag out a direction handle to prepare for the next path segment.
The left side of the dorsal fin consists mainly of one continuous curve upward until it gets near the very top, at which point the shape changes, so to create this curve, I'm going to click and drag at the point near the top where the curve will change direction. As we can see in the screenshot, this adds a curved path segment between the previous anchor point and the new one, but the curve is not yet following along the shape of the fin. It's going to need some fine-tuning:
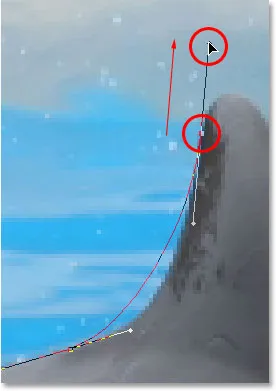
Adding a curve along the left side of the dorsal fin. The curve still needs some adjusting.
To adjust the curve, I'm simply going to hold down the Ctrl (Win) / Command (Mac) key, which gives me temporary access to the Direct Selection Tool, and I'm going to drag the handle extending out from the bottom anchor point towards the right to lengthen it, which is going to pull the angle of the curve in towards the right along with it, lining it up nicely with the curve of the fin. I've also rotated the top direction handles slightly in a clockwise direction just to be nit-picky, but the majority of the adjustment was done using the bottom direction handle:
Adjust the curve by adjusting its direction handles.
To add a curve around the top of the fin, I'll click and drag on the opposite side of it to add another anchor point with short direction handles. Notice though that we run into a bit of a problem. The direction handle on the left side of the curve is too long and it's pulling the curve away from the top of the fin:
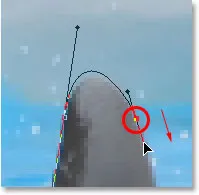
The direction handle on the left of the curve is too long, resulting in the curve not following the shape of the fin.
To fix that, all I need to do is once again hold down Ctrl (Win) / Command (Mac), then click on the end of the handle to select it and drag it shorter until the curve is the proper shape:
Shortening the length of the direction handle to adjust the shape of the curve.
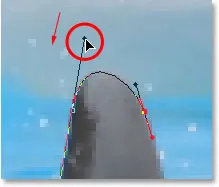
Let's finish creating our path around the dorsal fin. The remainder of the fin is basically a straight line, so I'm going to click at the base of the fin to add another anchor point which adds the straight path segment, completing our path around the fin:
Adding an anchor point at the base of the fin to finish drawing the path around it.
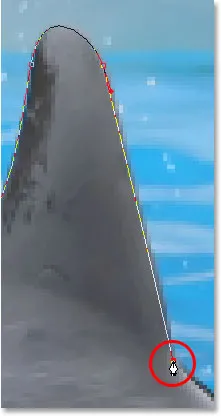
Since you and I would both be here all day if I was to continue commenting on every anchor point, direction handle and path segment as we make our way slowly around the dolphins, and since we've covered everything we need to know at this point, I'm going to go ahead and draw the rest of the path, outlining both dolphins:

Both dolphins are now outlined by the path.
The dolphins have now been outlined with the path, and if we look at the Paths palette, we can see that sure enough, we have a path in the shape of the dolphins:
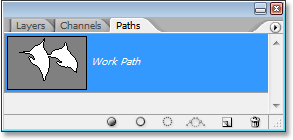
Photoshop's Paths palette showing the outline of the dolphins in the preview thumbnail.
As we've learned, Photoshop automatically names the path "Work Path", which means it's temporary and will be replaced if we start a new path. If you wanted to save it, you would need to double-click on the name "Work Path" and rename it to something else, like "Dolphins" in this case. I'm not going to worry about that, since I have no need to save it. All I want to do at this point is convert my path into a selection, and since I'm already in the Paths palette, I'll do that by clicking on the Load path as selection icon at the bottom of the palette:
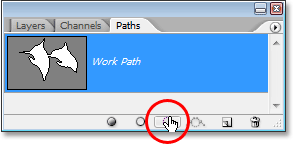
Clicking the "Load path as selection" icon at the bottom of the Paths palette.
I could also have used the keyboard shortcut Ctrl+Enter (Win) / Command+Return (Mac) . Either way converts my path into a selection, and if I look at my photo, I can see that my path has indeed become a selection around the dolphins:

The path around the dolphins has now been converted into a selection.
Waar ga je heen …
En daar hebben we het! The dolphins are now selected and ready for whatever plans we have for them. And with that, we wrap up our look at drawing paths and making selections with the Pen Tool in Photoshop! Voor meer informatie over de selectietools van Photoshop, zie onze Selecties maken in Photoshop-serie. Bezoek onze Photoshop Basics-sectie voor meer Photoshop-onderwerpen!